Here are my cards I made this year. I made a few of each to make it easier on myself. All designs are from Lori Whitlock and were purchased on the Silhouette design store. The shaker card I designed using the Silhouette Design studio.
Thursday, December 17, 2015
Christmas Cards 2015
Friday, October 16, 2015
Happy Halloween Mixed Media Canvas
Hi everyone. I have recently taken up mixed media and wanted to share my first project. It only measures 5"x7" but it was perfect for a first project.
For the background I used black acrylic paint and watered it down. Before it dried I dabbed it with a paper towel and it gave it a cool marble type effect.
After that dried I made some blood drips using the Golden high flow acrylic paints in Quinacridone Red. All you have to do is stand the canvas up and pour the paint on the top edge. It flows down quite nicely.
Next I added a spider web svg cut from the Gimme Candy Boxes kit at svgcuts.com.
I added a Happy Halloween card from an old paper stack that I had and outlined it with some red oil pastels.
Next I added some bats and finally I added some clear Wink of Stella to give it some sparkle. You can't really see it on the photo but the bats and spider web are quite shiny.
Being that this is my first time doing mixed media I'm really happy on how it turned out. I might be addicted.
Thanks for stopping by
Laura
Thanks for stopping by
Laura
Monday, October 12, 2015
Target Room Essentials Rolling Cart
I've been dying to buy the Raskog cart from Ikea but I don't have an Ikea in town and I hate paying for shipping. So I went to Target and look what I found. They have it in charcoal and white. And it was on sale for $30. Yay me!
You can check online if they have it in your area. Check here

You can check online if they have it in your area. Check here

Labels:
raskog cart,
rolling cart,
room essentials,
target
Monday, October 5, 2015
Scaredy Cat Halloween Card
Super quick share today. I made this card from scraps I had in my scrap drawer. Digi stamp is Trick or Treat Kitty from Cuddlebug Cuties.
Labels:
card,
cuddlebug cuties,
Halloween,
trick or treat kitty
Thursday, September 17, 2015
Suit and Tie Card
Hi everyone.
My nephew turned 22 years old last month. I can't believe he's an actual adult! He has become everything we hoped he would be and more. My husband and I wanted to make him a card that represented his style and we came up with a suit and tie. My nephew has become such a gentleman and thought this was perfect for him. My husband designed the card on Silhouette Studio and I put it all together. I love how it came out.
Thanks for stopping by
Laura
Thanks for stopping by
Laura
Tuesday, September 15, 2015
Tuesday, August 25, 2015
Doctor Who Tag
Hi everyone. Quick project share for you today. I bought a little gift for my daughter's first day of college and I wanted to spruce it up with one of her favorite characters.
The Doctor Who images are a svg cut file from prettypapergraphics.com and the tags were purchased from the Silhoutte store.

The Doctor Who images are a svg cut file from prettypapergraphics.com and the tags were purchased from the Silhoutte store.
Labels:
Doctor Who,
pretty paper graphics,
silhoutte,
tag
Friday, July 31, 2015
Card Share
So I was going through my pics and I realized I hadn’t posted these cards yet. I made these cards back in May and June. I can’t believe I didn’t post these!
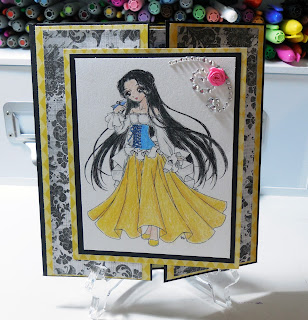
The first card I made for my daughter's 18th birthday. She loves Snow White and I found this gorgeous digi stamp from Make It Crafty. She told me out of all the cards I’ve made her this is her favorite. :)
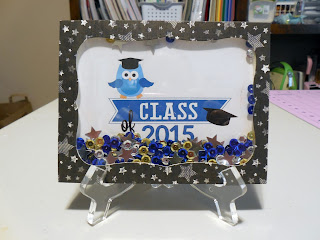
The second card I made for my daughter(again) for her graduation. I bought the clipart from Petie Studio on Etsy and the colors matched her high school colors perfectly. I decided I wanted a large shaker window to showcase the clipart and sequins. I didn’t realize it had taken up the whole card but I love the way it turned out.
Thanks for stopping by
Labels:
card,
digi stamp,
Fairest of All Princess,
Make It Crafty
Saturday, July 18, 2015
Miss Independent Bag
What a sewing adventure I had this week. A year or so ago I was blessed with a free copy of Big City Bags from Sara Lawson of sewsweetness.com. Craftsy was a having a giveaway of her new book and I was the lucky winner.
Almost every bag in this book caught my eye and I want to sew all of them but The Miss Independent Bag stood out. Here's a pic from the book.
When I saw this bag I fell in love. I immediately knew I had to make this bag to hold all my planners and accessories case. Here's how mine turned out.
Making this bag was a little challenging for me. I never used so many interfacings together in my life! But I love how sturdy it turned out. Now sewing the bias tape was the biggest challenge. Having to maneuver the bag around the sewing machine was tricky but I got it done. This bag took me about 4 days to make. Yikes!!
I made a few changes on mine. I didn't sew the outer pockets on the bag. Truth be told I ran out of interfacing and I didn't want to go out and buy more. It's way too hot!! As you can see the bag from the book is shaped a little different than mine. I decided I wanted my bag to be more rectangle. I don't remember why I decided to do that but I did. Also the pattern asks for ready made leather handles. The handles that I found where way to expensive so I made them instead. I used 1" webbing and made them at about 26" long. I love the way the webbing handles gives it a beach bag feel. I also made the laptop case for it. I didn't square off the bottom like in the book because I'm not using it for a laptop. I'm using it for my journal and journal supplies. And here's a pic with everything in it.
Everything fits perfectly! Now I don't have stay in one place while working on my planner or journal. I can just pick it up and carry it to any room . Or beach. :)
Labels:
Miss Independ Bag,
planner bag,
Sara Lawson,
tote bag
Monday, January 26, 2015
January Birthday Cards
A quick share on birthday cards I have made this month.
First up is a box card from Lori Whitlock. You can get the file here.
This next card I used Rose from The Paper Shelter. She went perfectly with the DCWV The Butterfly Garden paper stack.
And finally I found this pop out card in The Silhouette Store. Also by Lori Whitlock.
Thanks for stopping by.
Labels:
Birthday Card,
Lori Whitlock,
Silhouette,
The Paper Studio
Wednesday, January 7, 2015
Trying to Bring Snail Mail Back
I don't know about you but I miss snail mail. I remember getting so excited when I received a letter or card in the mail during vacation. Who's it from? What are they up to? Is she finally with Bobby? Yep, those were the days. Now with text and email it's so much quicker and easier to connect with people. But it seems so impersonal.
So I decided that I will send more cards out. Not just for holidays and birthdays but just to say hello. Maybe even a small handmade gift. Who knows, maybe your bad day turns out better just by getting a little something in the mail.
So if you start getting more cards than usual, treats or small gifts from me in the mail it just means I wanted to say hello. That's all!
Subscribe to:
Comments (Atom)


